As some of you may know, I recently announced my departure from the game and as such, the extreme guide is now in the community’s hands. This means it is down to you guys to edit it and keep it up to date now, anyone and everyone can now edit the guide. Please however do take caution as this is my legacy to the game which I am leaving to you guys, I would appreciate it if someone did not try and delete everything or ruin it as I will know and it can be reverted. Below I have outlined some information you may need to do basic editing and some advance editing for the wiki. Thank you for having me for 3 years and thank you for all putting up with my slow updates and sloppy work. Good luck!
 Ghastly.
How to edit on the HH WIKI
Step 1: Find the 3 dots on the top of any page

Step 2: Editing

Visual Editor

This type of editor is great if you do not understand how to use HTML/ CSS. It has basic functions such as allowing types of header/ body text same as the forum does here:
Header 1
Header 2
Header 3
Header 4

Additionally, basic text tools such as strikethrough, text size, super/sub script and even custom code can be added into the page through the use of this button.

If you are looking to upload a picture, then you will be making use of these buttons, the one on the left uploads 1 image and gives you control over what size, what type and alignments you would like and the one on the right is for uploading multiple images at once, however you will not be prompted to select image settings so you will need to do this individually after.

The insert tab won’t be used much unless you know what you are doing or have a need to use formulas, code blocks and infoboxes/ templates. However this is all advanced stuff I would not recommend touching.

This covers the basic visual editor, there is not a lot of control and some elements such as individual table control, boxes, elements and in text colour/ size changes can not be done unless you learn how to use HTML/ CSS in the source editor. Luckily I will cover the basic stuff on how to use it but you will need to learn how to use google to do it mainly.
HTML/ CSS Editor
I will start this page with the preface that I am not a coder and everything I have learned on the wiki is self taught.
When you open a page with information already on it such as this extreme category page then you may see a bunch of premade source edits, this is due to me using the source editor throughout my editing rather than the visual editor. When you use the visual editor, it will automatically use the correct corresponding codes however it is not always as clean as it could be and you have finer control with the source editor.
Some basic commands:
<p> - Start of a paragraph
</p> - end of a paragraph
This will allow spacing to be above and below your sentences rather than it all be line by line without needing to use the enter key after every block of text. For example:
This text does not have the paragraph command
This text does have the command and has a gap above and below it
As you can see this is the difference between using and not using the paragraph command<br> - line break
These are designed to break paragraphs up similarly to the above example use the paragraph command but to a larger extent and can be used rather than spamming the enter key. For example:
This text does have the command and has a gap above and below it
As you can see this is the difference between using and not using the paragraph command but is using the line break command, there is a larger gap than the above example.
<b> - makes text bold
</b> - marks where bolding ends
<u> - underlines text
</u> - marks where underlining ends
<i> - italicises text
</i> - marks where intalics end
Fairly self explanatory, however the command does not work on these forums. As you can see this text is both bold and italic
<span> - marks where and inline span element begin
</span> - marks the end of a span element
<div> - marks the start of a block division
</div> - marks the end of a division
Now this is where things can get more complicated, span and div controls are used to control a lot of things such as text size, colour, block elements, table elements etc. I will not be covering them all here as it is too much to fit but essentially div commands are used for entire blocks of area, such as creating a box which does not function on this forums either
<div style="border:5px outset red; padding:10px; background-color:#383838; text-align: center; font-size:20px;">
BOX CONTENT
</div>
Now the above box is simple, it uses a red outset border with a dark grey background as per the HTML colour value, the text is 20px size and it aligned to the center
<b><span style="color:#ff5151;">This text colour is red
</span>
Now this is an example of using span commands in line to change a section of text to red.
Now I will show and example combining them, as this does not work on the forums I will show an image below the code block
<div style="border:5px outset red; padding:10px; background-color:#383838; text-align: center; font-size:20px;">
<p>
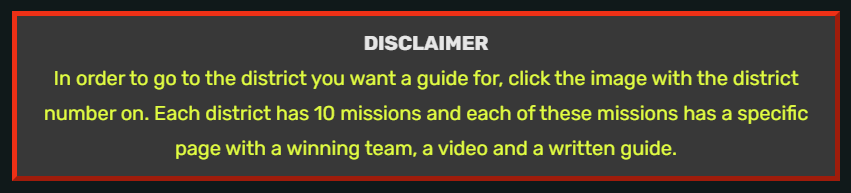
'''DISCLAIMER '''
</p>
<p>
<span style="color:#DBFF33;">
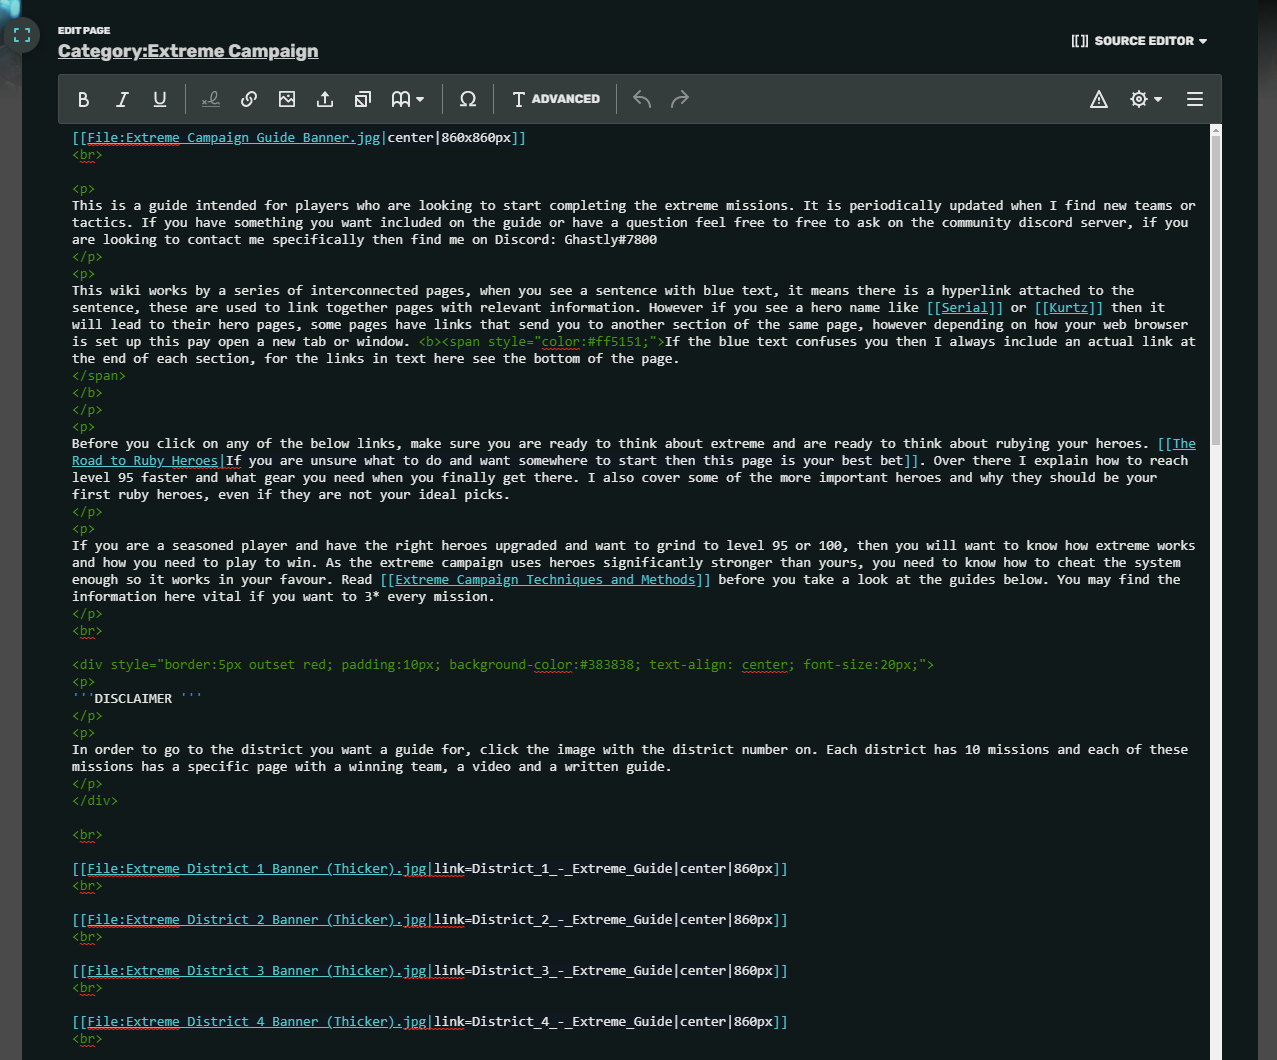
In order to go to the district you want a guide for, click the image with the district number on. Each district has 10 missions and each of these missions has a specific page with a winning team, a video and a written guide.
</span>
</p>
</div>
Locked pages

Some pages on the wiki may be locked or have a message like this which essentially means they are locked and cannot be edited unless I allow it.
Some things to note
I have not extensively covered how to edit on the guide here, I have shown some things and how to do them. I would appreciate it if you guys did not destroy the hard work I have put into the wiki as this is my legacy to the game. I can revert changes if people which to grief, I can block you from editing via IP ban. Thank you if you read this far and good luck. I will show below an example of adding a team to a extreme mission page.
You have a team to add
Let’s say you have a team to add to mission 4-1. You press edit via source editor.

Each guide page follows the same format as stated on the district pages:
- Mission Overview of rewards and enemies
- Things of note about this mission
- Winning 3☆ team screenshot and a written guide
- Video Guide using the winning 3☆ team
- Any alternative teams that also work in the same format
To add a team you can simply copy and paste the Winning 3☆ team with … text and code and add your image in below.
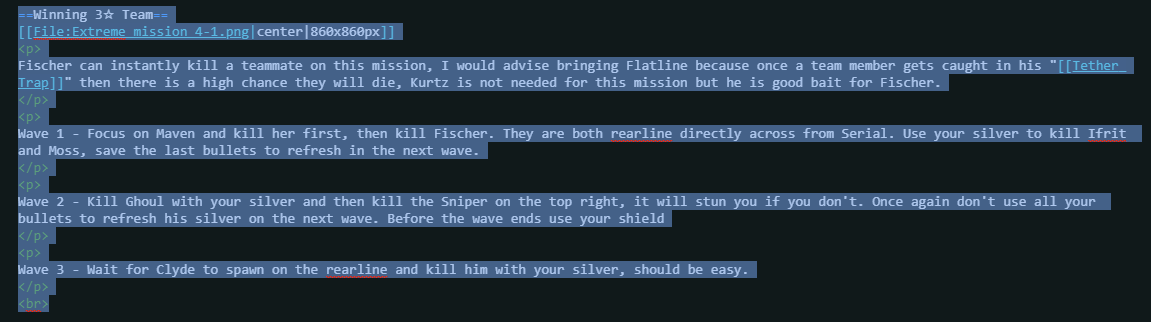
Copy this text, replace with your own image using the above steps and write in your own written guide. Remember if you use the source editor that every paragraph command must end with a < /p> but the
< br> break command does not.
Please do not try and thrust your team to the top of the page either, if you have a team then put it below whatever teams are already on the page. This is a community effort, not a bragging contest.
Thank you for your time.
